Within this guide, we aim to outline and demonstrate how you can setup an IPv6 Tunnel on your Virtual Server should such be necessary.
1. This guide is based upon Hurricane Electric's TunnelBroker service available here and is written for services utilising either Ubuntu or Debian operating systems. Make sure your service's permanent mitigation and service firewall is disabled as this will prevent the tunnel from functioning; you can learn more here on how to do this.
2. You must firstly connect to your service via SSH, for guidance on doing this please see our article available here and execute the following commands:
sysctl -w net.ipv6.ip_nonlocal_bind=1
nano /etc/network/interfaces
3. You will now need to navigate to the details of your TunnelBroker service (found here) and paste the following template at the bottom of the file you are currently editing:
auto he-ipv6
iface he-ipv6 inet6 v4tunnel
	address
	netmask
	endpoint
	local
	ttl 255
	gateway

post-up /sbin/ip -6 route replace local <your full routed subnet> dev lo
4. You will now need to add your TunnelBroker IPv6 subnet details, you will navigate to your service which should be displayed similar to such:
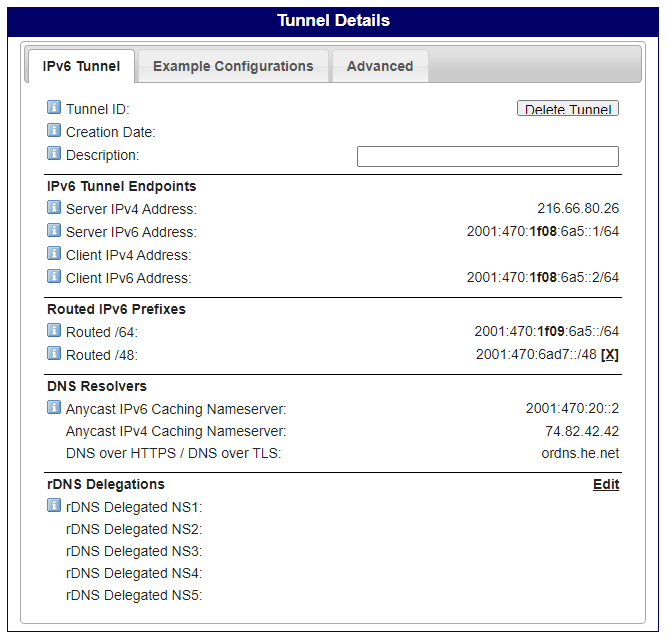
5. You will now need to copy the following details as displayed above into the template provided above via your SSH client, these should be arranged as shown below noting that the above template are not placeholders, you must enter the following details to the right of the respective variable with a space in-between:
- Your 'address' will be your 'Routed /64 or Routed /48' depending upon the subnet you wish to use. You will not need to include '/64 or /48' at the end of the address.
Your address should also end in '::2', as an example using the above details displayed (using our /48 subnet); the address would be: '2001:470:6ad7::2'. - Your 'netmask' will be the prefix of the subnet you are using, this will either be '64' or '48' and should not include any slashes. In our example, we would use: '48'.
- Your 'endpoint' will be the 'Server IPv4 Address' provided by TunnelBroker within the 'IPv6 Tunnel Endpoints' section. In our example, we would use: '216.66.80.26'.
- Your 'local' will be your server's IPv4 address with us, this will be the IPv4 address you used to connect via SSH and can be found within the deployment email sent out on purchase.
- Your 'ttl' should remain unchanged. Your 'gateway' will be the same as your 'address' set previously but instead of ending in '::2', this should end in '::1'. In our example this would be: '2001:470:6ad7::1'.
- Your 'your full routed subnet' will be your 'Routed /64 or Routed /48' which must end in '::1', include the subnet prefix (e.g. '/64' or '/48') and remove '<>'. In our example we would use: '2001:470:6ad7::1/48'.
- Above your configuration you have pasted in, you will find two lines like the following, simply add hashtags at the start of each line (this enables the tunnel to function but native IPv6 will not):
Bear in mind, you do not need to include any speech marks or apostrophes, we have simply listed them to clearly display what should only be listed.#post-up /sbin/ip -r route add <an IPv6 gateway, this does not need changing> dev eth0 #post-up /sbin/ip -r route add default via <an IPv6 gateway, this does not need changing> Make sure to not adjust the IPv6 gateways set by default, only add the hashtag as shown.
Please find below a sample configuration which your own configuration should look similar but not the same as to reference as a guide for aid where required:
auto he-ipv6
iface he-ipv6 inet6 v4tunnel
	address 2001:470:6ad7::2
	netmask 48
	endpoint 216.66.80.26
	local 51.38.161.81
	ttl 255
	gateway 2001:470:6ad7::1

post-up /sbin/ip -6 route replace local 2001:470:6ad7::1/48 dev lo
6. You will now need to execute the following commands to restart your networking service and test that the tunnel is functioning as expected (all commands should be run separately):
ifup he-ipv6 (if this fails/errors, restart your server via 'reboot')
ping6 -I he-ipv6 ipv6.google.com
ping6 -I <your IPv6 subnet without any ending, e.g. 2001:470:6ad7::> ipv6.google.com
7. For those who wish to use Lavalink's IPv6 rotation, please navigate to your Lavalink configuration and edit the following links accordingly (these include some recommended settings), restart Lavalink once complete:
ratelimit:
	ipBlocks: ["<your routed /64 or /48 subnet from TunnelBroker>"]
	strategy: "LoadBalance"
	searchTriggersFail: true